Topic outline

  • Content

    1. Availability Layer

    1.1 Availability Detection Module (ADM)

    The Availability Detection Module (ADM) is the 7S module for monitoring the availability of a device, service, or other 7SHIELD modules. It allows operators to be alerted when an element of the system to be protected is no longer functioning or is not functioning properly.  On its own, monitoring is not the most useful system in a security system. However, when coupled with cyber and physical detection systems, it can identify the stages of an attack and assess the impact of that attack. Finally, it also ensures that the system is always in a normal operating state to make sure that no protection module could fail during an attack.

    1.2 Availability Correlator (AC)

    The Availability Correlator (AC) is the 7SHIELD module used to evaluate Availability Detection Module events and to transform them into UAF alerts if necessary. AC can also be used as a filter area for events coming from the ADM. In a multiple ADM architecture (as explained later), the CA aggregates events from the ADMs.

    2. Main Purpose and Benefits 

    ADM and AC together form the availability part of the 7SHIELD system. These modules are used to detect any failure or attack on the network that results in a malfunction or shutdown of a monitored service, device, or 7SHIELD  module.

    Alone, this part of the system can specify that the supervised system is not in its nominal state. However, correlated (via the HCC) with the other parts of 7SHIELD, namely physical detection, and cyber detection, it allows a better understanding of the course of an attack and its consequences.

    It also allows operators to be more efficient in their supervision of the platform and in responding to incidents. Indeed, it allows them to simply focus on the part of the system that is affected.

    3. Main Functions

    3.1 Check modules, services, or hosts status

    Through the ADM, 7SHIELD can check the correct operation of devices, services, or 7Shield modules. Based on Nagios, ADM allows different types of verification: ping, service check, API test, etc.

    3.2 Issue availability events

    ADM is capable of issuing availability events to convey the status of a physical device or service.

    3.3 Issue availability alerts

    ADM can evaluate Availability Detection Module events, aggregate, filter, and transform them into UAF alerts if necessary.

    4. Integration with other modules

    ADM is a module of the Detection Layer of the 7SHIELD architecture. It allows you to monitor the availability of 7Shield services, hosts, and modules.

    AC is a module of the Situational Picture Layer of the  7SHIELD architecture. It issues availability alerts based on information from the ADM.

    These tools do not have a user interface. They only need to be configured by a system operator.

    When the status of a monitored element changes, the ADM issues an event which is received by the AC through the Kafka broker. The AC transforms this event into an alert if necessary and transmits it to the HCC via the Kafka broker.

    ADM does not take any data as input. AC uses ADM events as input.

    5. Infrastructure Requirements

    5.1 ADM infrastructure Requirements

    The installed ADM only represents a docker container. It can therefore be installed on any machine with the following dependencies:

    -            Docker

    -            Docker Compose

    The ADM can be installed on premise as close as possible to the services and devices to be monitored. It is quite possible to deploy several ADMs if the machines to be monitored are in different networks. To do this, you need to configure them by specifying for each one only the machines that concern it. In any case, each instance of ADM must have all the necessary rights to reach and write to the Kafka broker.

    It is also possible to install the ADM remotely. However, if the ADM is not on the same network as the machines to be monitored, it is necessary to use a VPN to monitor these hosts.

    5.2 AC Infrastructure Requirements

    The installed AC only represents a docker container. It can therefore be installed on any machine with the following dependencies:

    -            Docker

    -            Docker Compose

    The AC can be installed on-premise or remotely. In any case, each instance of AC must have all the necessary rights to reach and write to the Kafka broker.

    6. Operation Manual

    6.1 Set-up

    6.1.1. Install and start the ADM 

    Prerequisites:

    -            To have cloned the ADM git repository

    -            To have a folder that contains all needed certificate for the broker connection

    -            Have configured the ADM (as described below in the section "Configure the ADM")

    First, we need to configure the global environment variables for the execution of the docker-compose main command. To do this, simply edit the .env file.

    The following variables must be filled in:

    -            CURRENT_ENV: The path to the env file used for environment variables internal to the container

    -            CURRENT_CERTIFICATES: The path to the folder containing all certificates files used for Kafka connection.

     The only operation required to install and start the ADM is to run the following command in the root of the ADM repository.

    docker-compose up -d –build

    To avoid rebuilding the ADM docker image each time, it is more appropriate to run the command without the build argument, i.e:

    docker-compose up -d

    To access the ADM logs, use the following command:

    docker-compose logs -f


    6.1.2 Main structure of ADM repository 

    The git repository contains the following main folders and files:

    -            env: This folder contains environments files used to build the environment of the ADM docker container.

    -            files: This folder contains all the files useful to the container.

    -            .env: This file contains the main environment variables needed to run the docker-compose command.

    -            Dockerfile: This file is the Dockerfile used to build the docker image of the ADM container.

    -            docker-compose.yml: This file is the docker-compose file used by the docker-compose command.

    6.1.3 Configure the ADM

    Set up the container environment:

    The env folder contains multiple environment files which describe the useful environment variables for each environment.

    The naming convention used is <ENVIRONMENT NAME>.env.

    The following environment variables must be filled in:

    -            TZ: Setup the time zone used

    -            BOOTSTRAP: Contains the complete url (hostname:port) of the Kafka Broker

    -            ALERTS_TOPIC:  Contains the topic on which ADM events will be sent.

    -            CHECKS_INTERVAL: Configure the delay into each check

    -            KAFKA_CAFILE: The container internal path to the CA file used for the Kafka connection.

    -            KAFKA_CERTFILE: The container internal path to the cert file used for the Kafka connection.

    -            KAFKA_KEYFILE: The container internal path to the key file used for the Kafka connection.

    -            KAFKA_PASSWORD: The certificate password used for the Kafka connection.

    -            DEBUG=1: Starts the ADM in debug mode


    Set up the rules folder:

    To set up the rules folder, simply put all the correlation rules you want to use in one folder (in the rules main folder). The path to this folder should be entered in the main .env file.


    Set up the certificates folder:

    To set up the certificate folder, simply put the certificates and other files needed for authentication when connecting to the broker in the same folder. The path to this folder should be entered in the main .env file.

    6.1.4 Configure the environment for the ADM

    The only thing to configure is to ensure that the ADM can reach the Kafka broker.

    6.1.5 Install and start the AC

    Prerequisites:

    -            To have cloned the AC git repository

    -            To have a folder that contains all needed certificate for the broker connection

    -            Have configured the AC (as described below in the section "Configure the AC")

    First, we need to configure the global environment variables for the execution of the docker-compose main command. To do this, simply edit the .env file.

    The following variables must be filled in:

    -            CURRENT_ENV: The path to the env file used for environment variables internal to the container

    -            CURRENT_CERTIFICATES: The path to the folder containing all certificates files used for Kafka connection.

    The only operation required to install and start the AC is to run the following command in the root of the AC repository.

    docker-compose up -d –build

    To avoid rebuilding the AC docker image each time, it is more appropriate to run the command without the build argument, i.e:

    docker-compose up -d

    To access the AC logs, use the following command:

    docker-compose logs -f

    6.1.6 Main structure of the AC repository 

    The git repository contains the following main folders and files:

    -            env: This folder contains environments files used to build the environment of the AC docker container.

    -            files: This folder contains all the files useful to the container.

    -            .env: This file contains the main environment variables needed to run the docker-compose command.

    -            Dockerfile: This file is the Dockerfile used to build the docker image of the AC container.

    -            docker-compose.yml: This file is the docker-compose file used by the docker-compose command.

    6.1.7 Configure the AC

    Set up the container environment:

    The env folder contains multiple environment files which describe the useful environment variables for each environment.

    The naming convention used is <ENVIRONMENT NAME>.env.

    The following environment variables must be filled in:

    -            BOOTSTRAP: Contains the complete url (hostname:port) of the Kafka Broker

    -            CONSUMER_TOPICS:  Contains the topic in which the ADM issues its events.

    -            PRODUCER_TOPIC: Contains the topic on which AC alerts will be sent.

    -            KAFKA_CAFILE: The container internal path to the CA file used for the Kafka connection.

    -            KAFKA_CERTFILE: The container internal path to the cert file used for the Kafka connection.

    -            KAFKA_KEYFILE: The container internal path to the key file used for the Kafka connection.

    -            KAFKA_PASSWORD: The certificate password used for the Kafka connection.

    Set up the rules folder:

    To set up the rules folder, simply put all the correlation rules you want to use in one folder (in the rules main folder). The path to this folder should be entered in the main .env file.

     Set up the certificates folder:

    To set up the certificate folder, simply put the certificates and other files needed for authentication when connecting to the broker in the same folder. The path to this folder should be entered in the main .env file.

    6.1.8 Configure the environment for the AC

    The only thing to configure is to ensure that the AC can reach the Kafka broker.

    6.2 Getting started

    6.2.1 General working of the ADM

    This section presents the functional behaviour of Availability Detection Module. ADM is based on the open-source monitoring solution Nagios.

    Nagios, or Nagios Core, is scheduling software that monitors systems, networks, and infrastructure. Nagios provides monitoring and alerting services for servers, switches, applications, and services. It alerts users to incidents and notifies them a second time when the problem has been resolved. Nagios was originally designed to run on Linux, but it also works well on other Unix variants.

    In the 7Shield scope, ADM is mainly used for monitoring target devices and systems, through ICMP, SNMP and HTTP protocols.

    After making a check, ADM reports a status change using its connection to the Kafka broker. This connection is specified by the file files/bin/notify_broker.

    6.2.1 Writing a command

    ADM uses a command object to define a supervisory operation to be performed. Commands are specified in the file files/etc/nagios/commands.cfg. Commands that can be defined include service checks, service notifications, service event handlers, host checks, host notifications, and host event handlers.

    This is an example of a command used to monitor a rest API to check that it is still running:


    Lines explanation:

    • Define command: Indicates that an object of type command is initiated
    • Command_name:  Gives the command a name, which will be used in all other configuration files to reference this command.
    • Command_line: Indicates the command issued. Here: 

    o   /usr/local/bin/check_rest_api: We run the check_rest_api command. This command is a script specific to the ADM. It would also be possible to use: a linux command, a nagios script, etc.

    o   -t: Indicates a timeout

    o   -a: Hostname of the API

    o   -p: Port of the API

    o   -e: API entry to be checked

    To add a command, simply add a command block to this file.


    6.2.2 Add a new host

    A host definition is used to define a physical server, workstation, device, etc. that resides on your network.

    Hosts are specified in the file files/etc/nagios/hosts.cfg

    Example of host :


    Lines explanation:

    Use: Define the generic service or host to use

    Host_name: This directive is used to define a short name used to identify the host. It is used in host group and service definitions to reference this host. Hosts can have multiple services (which are monitored) associated with them. When used properly, the $HOSTNAME$ macro will contain this short name.

    Alias: This directive is used to define a longer name or description used to identify the host. It is provided to allow you to identify a particular host more easily. When used properly, the $HOSTALIAS$ macro will contain this alias/description.

    _PORT: Port of the services to check on the device (Custom parameter)

    _APIENTRY: Entry of the API to be controlled (Custom parameter)

    Address: IP address of the device

    A host can use another host, this allows certain parameters to be defined in a general way. It is then sufficient to configure the use parameter in the hosts using it.

    Example with the generic-webservice used by the previous host:
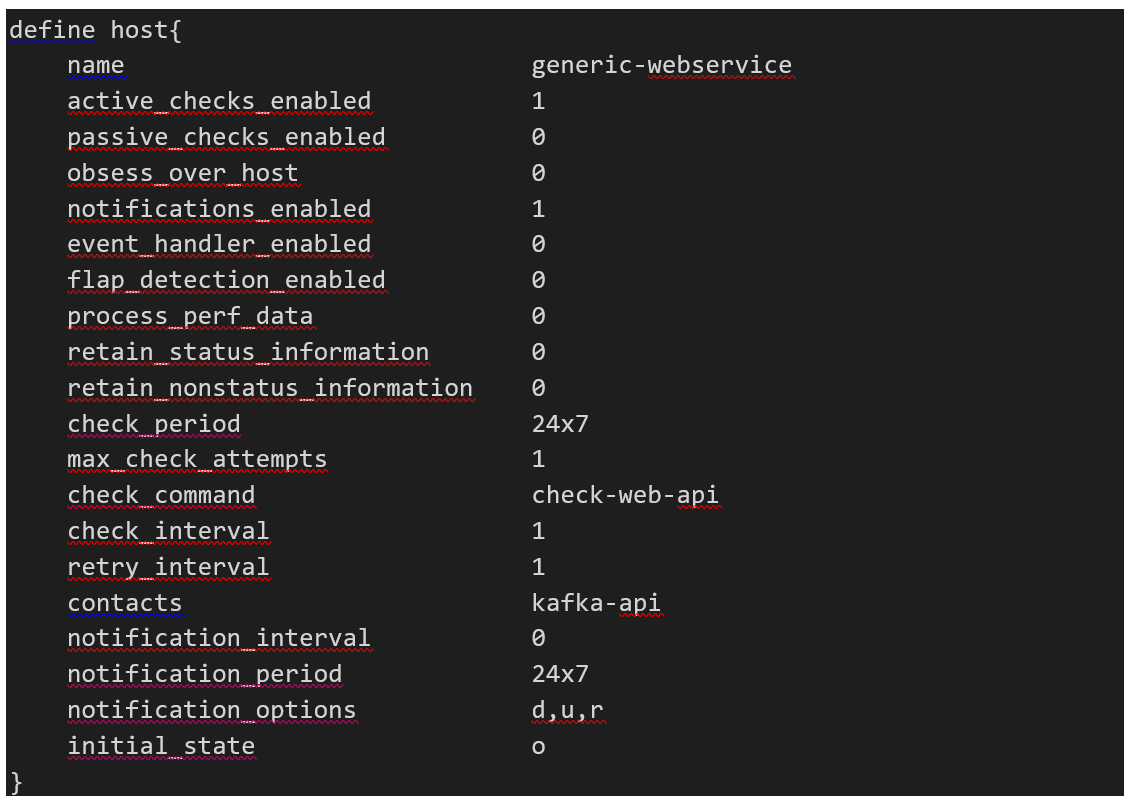

    Lines explanation:

    -            Active_checks_enabled: his directive is used to determine whether active checks (either regularly scheduled or on-demand) of this host are enabled. Values: 0 = disable active host checks, 1 = enable active host checks (default).

    -            Passive_checks_enabled: This directive is used to determine whether passive checks are enabled for this host. Values: 0 = disable passive host checks, 1 = enable passive host checks (default).

    -            Obsess_over_host:        This directive determines whether checks for the host will be "obsessed" overusing the ochp_command.

    -            Notifications_enabled: This directive is used to determine whether notifications for this host are enabled. Values: 0 = disable host notifications, 1 = enable host notifications.

    -            Event_handler_enabled: This directive is used to determine whether the event handler for this host is enabled. Values: 0 = disable host event handler, 1 = enable host event handler.

    -            Flap_detection_enabled: This directive is used to determine whether flap detection is enabled for this host. More information on flap detection can be found here. Values: 0 = disable host flap detection, 1 = enable host flap detection.

    -            Process_perf_data: This directive is used to determine whether the processing of performance data is enabled for this host. Values: 0 = disable performance data processing, 1 = enable performance data processing.

    -            Retain_status_information: This directive is used to determine whether status-related information about the host is retained across program restarts. This is only useful if you have enabled state retention using the retain_state_information directive. Value: 0 = disable status information retention, 1 = enable status information retention.

    -            Retain_nonstatus_information: This directive is used to determine whether non-status information about the host is retained across program restarts. This is only useful if you have enabled state retention using the retain_state_information directive. Value: 0 = disable non-status information retention, 1 = enable non-status information retention.

    -            Check_period: This directive is used to specify the short name of the time during which active checks of this host can be made.

    -            Max_check_attempts: his directive is used to define the number of times that Nagios will retry the host check command if it returns any state other than an OK state. Setting this value to 1 will cause ADM to generate an alert without retrying the host check. Note: If you do not want to check the status of the host, you must still set this to a minimum value of 1. To bypass the host check, just leave the check_command option blank.

    -            Check_command: This directive is used to specify the short name of the command that should be used to check if the host is up or down. Typically, this command would try and ping the host to see if it is "alive". The command must return a status of OK (0) or ADM will assume the host is down. If you leave this argument blank, the host will not be actively checked.

    -            Check_interval: his directive is used to define the number of "time units" between regularly scheduled checks of the host. Unless you've changed the interval_length directive from the default value of 60, this number will mean minutes.

    -            Retry_interval:                This directive is used to define the number of "time units" to wait before scheduling a re-check of the hosts. Hosts are rescheduled at the retry interval when they have changed to a non-UP state. Once the host has been retried max_check_attempts times without a change in its status, it will revert to being scheduled at its "normal" rate as defined by the check_interval value.

    -            Contacts: This is a list of the short names of the contacts that should be notified whenever there are problems (or recoveries) with this host. Multiple contacts should be separated by commas.

    -            Notification_interval:   This directive is used to define the number of "time units" to wait before re-notifying a contact that this service is still down or unreachable. Unless you've changed the interval_length directive from the default value of 60, this number will mean minutes. If you set this value to 0, ADM will not re-notify contacts about problems for this host - only one problem notification will be sent out.

    -            Notification_period: This directive is used to specify the short name of the time during which notifications of events for this host can be sent out to contacts. If a host goes down, becomes unreachable, or recoveries during a time which is not covered by the time, no notifications will be sent out.

    -            Notification_options:   This directive is used to determine when notifications for the host should be sent out. Valid options are a combination of one or more of the following: d = send notifications on a DOWN state, u = send notifications on an UNREACHABLE state, r = send notifications on recoveries (OK state), f = send notifications when the host starts and stops flapping, and s = send notifications when scheduled downtime starts and ends. If you specify n (none) as an option, no host notifications will be sent out.

    -            Initial_state:     By default, ADM will assume that all hosts are in UP states when it starts. You can override the initial state for a host by using this directive. Valid options are o = UP, d = DOWN, and u = UNREACHABLE.


    For more details on configuring hosts, services, commands, and other Nagios objects, please refer to the following link:

    6.2.3 Global configuration

    For general nagios configuration, simply update the file files/etc/nagios/nagios.cfg.

    All parameters in this file can be modified as described in the following documentation:

    https://assets.nagios.com/downloads/nagioscore/docs/nagioscore/3/en/configmain.html


    6.3 Nominal operation

    6.3.1 Notifications

    The only outputs from the ADM are the availability events generated.

    The only outputs from the AC are the availability alerts generated.

    6.3.2 Data entry

    The only input data expected for the proper functioning of the module is the configuration of the ADM.

    The only input data expected for the proper functioning of the module is the configuration of the AC.

    6.3.3 User Inputs

    No input data is expected by the user.

    6.3.4 User output

    The only outputs from the ADM are the availability events generated.

    The only outputs from the AC are the availability alerts generated.


    • Acronyms

      AC                                      Availability Correlator

      ADM                                  Availability Detection Module

      API                                     Application Programming Interface 

      CI                                       Critical Infrastructure

      CIP                                     Critical Infrastructure Protection

      C/P                                     Cyber/Physical

      EC                                      European Commission

      EU                                      European Union

      HCC                                   Hyper Combined Correlator

      SGS                                   Satellite Ground Station

      UAF                                   Unified Alert Format