1. Short Description
The aim of the secure authentication
mechanism is to improve the security posture of the Ground Segments of Space
Systems of the EU. As result, we developed a Secure Authentication Mechanism
that enables authorized end-users to access the 7SHIELD systems and
applications through a Single Sign-on service. End-users once authenticated
will not be prompted to log in to specific 7SHIELD services or applications
since the SSO will handle the authentication process for each session. The SSO
centralizes the end-user account information into a single point and then
generates the necessary authentication data for each requested application and
service.
The Secure Authentication Mechanism is
composed of the following components:
- A proxy service
and ingress point (ApiSix) to handle requests and network traffic from the
public internet
- An IAM service
to handle the authentication process for end-users and components of 7SHIELD.
This component is composed of a Keycloak service and the MFA service.
- A distributed
database (Hyperledger) to securely store data
- A monitoring
component to provide metric information from the deployed instances
- An alert
component to notify administrators of security and other related issues
2. Main Purpose and Benefits
The 7SHIELD Secure authentication
mechanism is designed to perform the following activities:
- Real-time
user provisioning and de-provisioning
- Centralized
authentication
- Intuitive and
easy log-in
- Interoperability
with Ground Segment platforms via secure public (Internet) connection
- Strong user
data storing
- Anomaly
detection and brute force protection will block the hacker’s IP address after
too many attempts, and the application owner will be notified by email.
A robust identity management solution can
create a flexible environment for 7SHIELD innovation, thereby helping
companies, involved in Satellite Data Distribution, drive innovation, and
realize revenue goals while protecting user’s information.
The expected innovations of the Secure
Authentication mechanism are listed below:
- Multi-factor
authentication (Passwordless); through the usage of hardware components in the
form of secure elements, such as smart cards and SIM cards, it provides an
alternative user authentication method. The secure elements enabled
cryptographic functions without exposing the stored certificates and other
security tokens. The Section 3.2.3 describes these functions.
- Blockchain
technology applied to the personal data and password storage.
- Modular
and Scalable (Kubernetes); Kubernetes focuses on open-source and modular
orchestration, offering an efficient container orchestration solution for
high-demand applications with complex configuration.
3. Main Functions
The set of functions for Secure
Authentication Mechanism working is summarized in this chapter in the sections
listed below and represented in the following diagram:
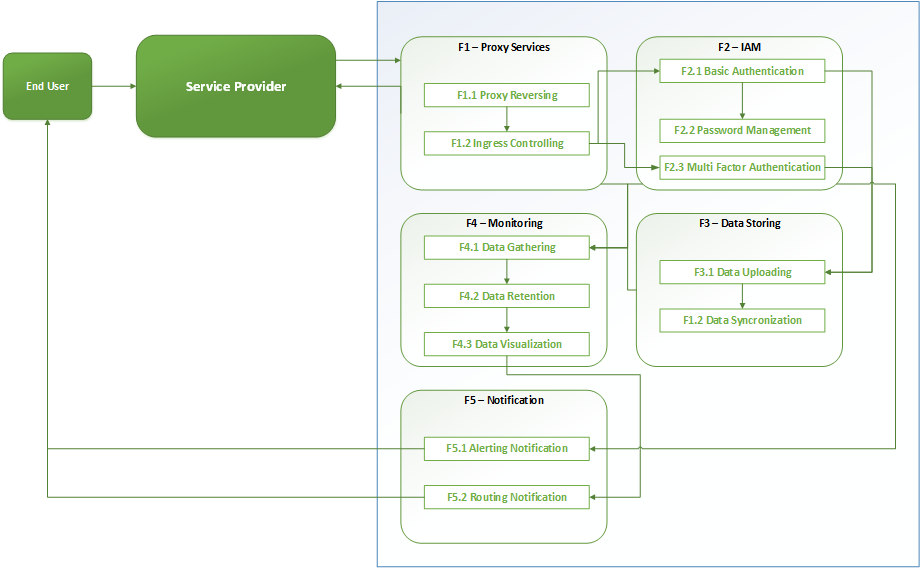
Figure 3 - Secure Authentication Mechanism Functions
3.1 Proxy Service
The Proxy Service function of the 7SHIELD
Secure Authentication Mechanism is decomposed in the following sub-functions:
- Proxy Reversing
- Ingress Controlling
3.1.1 Proxy Reversing
Proxy Reversing ensures the exposure of 7SHIELD Secure Authentication Mechanism
services via the Internet to the Ground Segment platforms.
A
reverse proxy acts as an intermediary for the servers associated with it to be
contacted by any client. It works as a communication interface that accepts
requests and forwards them to a target IT instance, it is used to provide
client devices with controllable access to the internet.
3.1.2 Ingress Controlling
Without additional configuration,
services deployed in a Kubernetes cluster are not accessible outside the
cluster overlay network, which means that they cannot be accessed by the
reverse proxy. To route external traffic into the cluster it is needed to
create a special Kubernetes resource, a NodePort. A NodePort must be created
for each service. For each NodePort the Kubernetes control plane allocates
randomly a port (the port can be specified but by default it is between 30000 and 32767). Once finished, the service is
accessible on the allocated port on any node of the Kubernetes cluster.
The first problem is that the service is
exposed on a non-standard port which is not acceptable for production use
cases; the second is that all the security vulnerabilities are all exposed by
the service.
To deal with the security concerns it is
better to use an Ingress resource than directly a NodePort. An Ingress object
exposes HTTP and HTTPS routes from outside the cluster to services within the
cluster. The NodePort is attributed to the Ingress and not directly to the
service and the Ingress routes the external traffic to the service using rules
declared at the creation of the Ingress. These rules are used to define routing
policies like load balancing, fanout or master/slave. To be able to use Ingress
resources, an Ingress Controller must be configured for the cluster. There are
numerous open sources Ingress Controller solutions: Ambassador, Istio Ingress,
HAProxy Ingress, NGINX Ingress, and ApiSix. Most of the time, these solutions
do not only provide only traffic routing but also act as a local API Gateway
providing SSL termination, Authentication, ACL, Rate Limiting, CORS, Proxy
Cache, or Trace.
3.2 IAM (Identification Access Management)
The IAM function of the 7SHIELD Secure
Authentication Mechanism ensures user registration, authentication, and
authorization process.
The function guarantees that no
unauthorized access is performed to the system so that the information hosted
on the 7SHIELD Secure Authentication Mechanism and interface delivery point is
protected against unrequested divulgation.
It is decomposed in the following
sub-functions:
- Basic Authentication
- Password Management
- Multi Factor Authentication
3.2.1 Basic Authentication
Basic Authentication guarantees the user's registration to the Ground Segment platforms
through basic authentication via email/username and password for users.
User credentials, access rights and
authentication are encapsulated in the Java Web Token format and are exchanged
between the Service Providers (GS Data Distribution services) and the Identity
Provider (7SHIELD Secure Authentication Mechanism) to guarantee access to the
applications.
Basic Authentication is based on OIDC
authentication protocol.
It is an authentication protocol which
allows to verify user identity when a user is trying to access a protected
HTTPs end point.
It can link a user’s digital identity
across separate security domains. In other words, when two applications are
“federated,” a user can use one application by authenticating their identity
with the other, without needing to create separate usernames/passwords for
both. The application responsible for performing this authentication is known
as the Identity Provider (IDP).
Figure 3 - Basic Auth with OIDC protocol
3.2.2 Password Management
Password Management guarantees the usage of a Password Policy for user passwords. The
policy contains some adjustable parameters, such as:
- Character Types (e.g., Parameters: Minimum length for passwords,
Lowercase characters, Uppercase characters, Numerical characters (0-9), Special
characters)
- Password blacklisting
- Session expiration settings
3.2.3 Multi Factor Authentication
In the 7SHIELD MFA we make use of
certificates instead of passwords to authenticate edge components. This choice
was made for several reasons. From a security perspective, passwords are
usually the weak link and the main target of malicious actors. The FIDO
alliance is spearheading the passwordless authentication standards with the
publication of FIDO2 (https://fidoalliance.org/fido2/)
By
replacing passwords with more secure alternatives, such as Secure Elements
(SEs), we can significantly improve the security posture of a system or a
process. While, the majority of devices and operating systems support a variety
of SEs, such as secure enclaves, TPMs, it is not commonplace or intuitive for
the user authentication process to use additional hardware components. Hardware
solutions for user authentication include secure USB keys, biometrics, and dedicated token
generator devices that the user needs to use during the authentication process.
Introducing an additional hardware component in the authentication process not
only increases the attack vectors of the system but also increases the
complexity for the user.
Another option for passwordless user
authentication that does not rely on hardware components is the Social Login.
The main idea behind the Social Login is to provide a single sign-on for
end-users by using information from identity providers. Users can sign into a
service or application without requiring registration for a new account. This
not only simplifies registrations and logins for end-users but reduces the
impact of security breaches, since no data that can be used to compromise a
user account are stored on the service. Furthermore, the Social Log in the authentication
process is privacy respecting since the only information that the service has
on a user is their email address, which can be their actual email address or a
proxy one set up by their identity provider.
The MFA supports both options, the authentication
through hardware components, and the authentication through Social Login. The
following Social Login providers are supported:
- Apple
- Facebook
- Github
- Google
3.3 Data storing
There are three main families of storage
systems that allow file sharing between distributed services:
- Centralized shared storage
systems such as NFS or SFTP, these systems are straightforward to deploy but
they are fragile and do not scale well.
- Distributed storage systems that fragment and distribute files
across cluster nodes and rely on duplication or erasure coding to ensure data
sustainability. These storage systems are especially useful because, although
distributed, they offer Portable Operating
System Interface (POSIX) compatible interfaces. Although they are simple to use, they
can be quite complex to implement and operate.
- Object storage, made popular by
public cloud providers, are very robust and virtually infinitely scalable.
Their drawbacks are that they do expose POSIX interface like distributed
storage but HTTP interfaces, often simple but not standardized (S3, Swift,
Azure Blobs), the data rate per connection and the latency is far from SSD
standards.
For the POC we we proposed to use block
storage as data storage solution.
User data will be stored through Oauth2
gateway server which offers availability to encrypt data.
To guarantee the confidentiality and the
integrity of this data it is also necessary to provide an encryption system.
The two main general methods for file encryption are:
- Symmetric encryption, which is fast but uses the same key to encrypt
and decrypt data which causes an integrity problem because if you want to only
grant read privileges to a user, this user needs the (encryption) key to read
the data.
- Asymmetric encryption, which solves the problem of integrity by
using different keys to encrypt and decrypt but that is slower than symmetric
encryption.
We proposed to use Asymmetric encryption
as we need a strong integrity and regarding the time spent to encrypt/decrypt
is not significant compared to the need.
3.3.3 Data Synchronization
The Database synchronization is done by
Oauth2 gateway ( user federation )which writes data over swagger to be stored in Hyperledger fabric.
Figure 3 - Blockchain-based federated identity
framework
3.4 Data monitoring
Given the fact that the Secure
authentication mechanism components produce verbose logs, the following main goals
are associated to the Monitoring component:
- monitor components by means of
specific parameters
- report these information using data
stored in real-time and long-term databases
- provide feedback and alert the
authenticated users to significant events related to the probed
components.
This function is split into
subfunctions which will be described in the following sections, specifying what
are their providers and consumer:
- F4.1 Data Gathering
- F4.2 Data Retention
- F4.3 Data Visualization
With those subfunctions, the Secure
Authentication Mechanism ensures the following actions:
- Log analysis
- Set up security dashboard
- Send security notification
- Policy monitoring
- Active response
- Network analysis
- Container accurate activity footprint
The purpose of this function is to
gather the relevant parameters, activity, security events and route them (make
them available) to the data storage function. This function is composing of a list of
sensors (Log Collector, and Metric collector) hosted on bare metal nodes.
- The logs in ASCII format of a specific
service component.
- Metrics of HW/SW infrastructure.
- Container Runtime Security.
Data consumer is a Data retention
function.
The purpose of this function is to
store the information made available by the data providers in a suitable
datastores structure. A real-time database, designed as a rolling archive
providing access with minimal delay to the parameters of interest.
The data provider is the data
gathering function (previous paragraph).
- The
Visualization function for providing a graphical representation of the stored
data
- The
central Node gathers all security sensor and log to be stored
- The
Notification function (see section 3.5) for
triggering actions based on occurrence of predefined conditions in the datastores
- Monitoring Function of the metric
HW/SW infrastructure.
The purpose of this function is to visualize archived data, by means of
histograms, scatterplots, and mimics. It is the core function allowing system
monitoring.
The data provider is the data
retention function (see section 3.4.2).
Data consumers are final users
(via web-browsers).
3.5 Notifications
The Secure Authentication Mechanism
can send emails, both to users registered with the 7SHIELD service and to its
operators/administrators.
The following main goals are
associated to the Notification component:
- password expiration
- change password
- authentication via mail (2FA)
- login failure event
- state of the infrastructure (POD and Services)
- slowness of communication
- encryption problems
This function is split into subfunctions
which will be described in the following sections, specifying what are their
providers and consumer:
- Alerting Notification
- Routing Notification
This function is composing of PostFix, a
free and open-source mail transfer agent (MTA) that routes and delivers email.
The purpose of this function is to
generate alerting notification from data monitoring application. In fact, these
notifications were sent by e-mail from:
- Prometheus,
via its Module Altermanager
- Graylog ,
via its module notification
3.5.2 Routing Notification
The purpose of this function is to
route alerts to external users/admin via email.
In fact, users can be contacted by
email in the following cases:
- Password
expiration: A user’s password is close to expiration and there is a need to set a new one.
- Change
password encryption: A user requests a password change via the service, and an email is then sent to the user to
change the same.
- Authentication
via mail (2FA): A user activates a type of 2FA authentication for which at the time of login, after having signed the User and Password, a private
email is sent to the user containing an access link to
authenticate.
- Login
failure event: An authorized person fails (the first time or after a certain
number of attempts) authentication (User or Password incorrect) and the user is
informed by email of the unsuccessful login attempt.
In fact,
operators/administrators can be contacted by email in the following cases:
- State of
the infrastructure: An email could besent in the event that the components of
Kubernetes (POD, Service, Ingress) become unreachable or go into distress due
to the saturation of computational resources.
- Encryption
problems: An email could besent if the encryption protocols used by the system
(internally and externally) run into problems (e.g.,Expired TLS key).
This function is composing of
Postfix then collects, routes, and manages notification email.
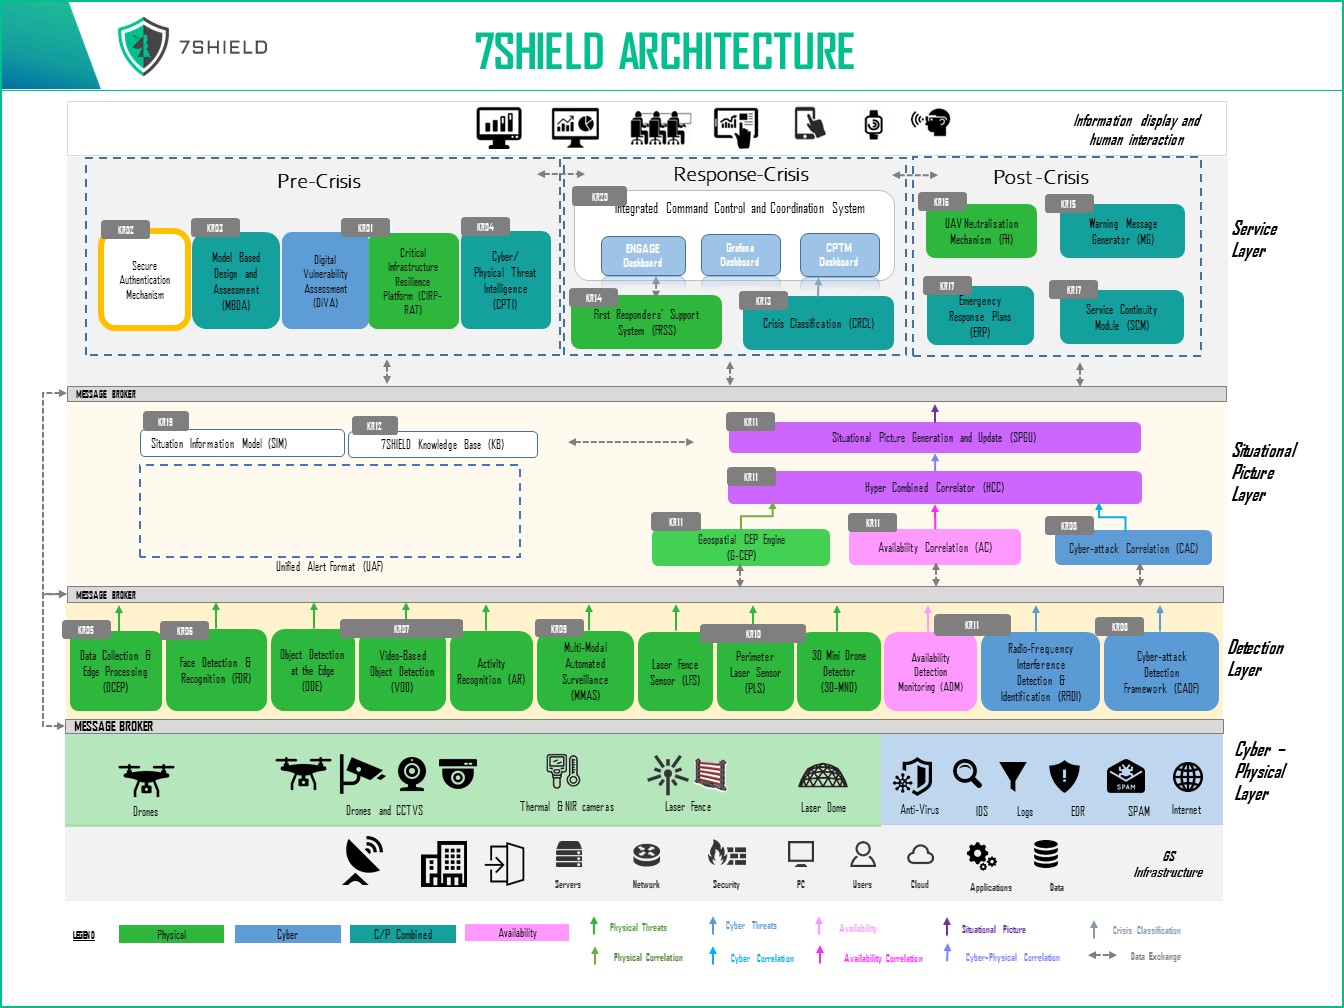
Figure 4 Secure authentication mechanism in the context of
7SHIELDThe Secure
Authentication Mechanism Provides with a user interface and an administrative
panel and its integration in the 7SHIELD project allows users, operators, and
administrators to access to the modules listed below:
- KR01:
Digital Vulnerability assessment
- KR03:
Model Based Design and Assessment
- KR03:
Critical Infrastructure Resilience Platform
- KR08:
Cyber Attack detection framework dashboard
- KR11: Situational
picture and generation update
- KR20: Integrated
Command Control and Coordination system
Moreover, the Secure authentication
mechanism is monitored by KR11 (infrastructure availability) and KR08 (logs).
5. Infrastructure Requirements
The 7SHIELD Secure authentication mechanism
is developed with a cloud-based infrastructure and can be used by the various
data access Ground Segment platforms through a secure public connection via the
Internet.
6. Operation Manual
6.1 Integration of the secure authentication mechanism with a
new service
Keycloak (Keycloak, “Open Source
Identity and Access Management”. https://www.keycloak.org/ Last accessed
February 2022) is an open-source identity and access management solution
targeted towards modern applications and services. It offers features such as
Single-Sign-On (SSO), Identity Brokering and Social Login, User Federation,
Client Adapters, an Admin Console and an Account Management Console.
Furthermore, it provides authentication to applications and secure services
with no need to deal with storing users or authenticating user because it has a
built-in Relational DataBase Management system (RDBM) for storing login
information and tracing users’ activities. The main concepts on which Keycloak
is based are the following:
- Realm: a realm secures and manages security metadata for a set of users,
application, and registered auth clients;
- Client: clients are entities that can request authentication of a user
within a realm;
- Role: roles identify a type or category of user. Keycloak often assigns
access and permissions to specific roles rather than individual users for a
fine-grained access control.
More explicitly, a realm is a
management entity that manages a set of users, credentials, roles, and groups.
A user belongs to and logs into a realm. Realms are isolated from one another
and can only manage and authenticate the users that they control.
On the other hand, roles are single
or set of authorities that define the category of user. Frequently these roles
are used for accessing controls on resources. Hence, a role granted to a user
is checked with the roles assigned to the resource of which the user trying to
access.
Each client should be associated to
a realm and for each client Keycloak foresees three different types of roles,
as reported in the official documentation (Keycloak, “Server Administration
Guide”.
https://www.keycloak.org/docs/latest/server_admin/#keycloak-features-and-concepts
Last accessed February 2022):
- Realm
Role: are a namespace for defining roles;
- Client
Role: are namespaces dedicated to clients.
Each client gets its own namespace. Client roles are managed under
the Roles tab for each client.
- Composite
Role: is a role that can be associated with
other roles. For example, a superuser composite role could be
associated with the sales-admin and order-entry-admin roles.
If a user is mapped to the superuser role they also inherit
the sales-admin and order-entry-admin roles.
Figure 6‑1finds
out how these roles actually work depicting a simple Realm model. A Realm can
have one or multiple clients and each client can have multiple users attached
to it. A user can access a specific client only if he has been assigned the
appropriate role.
Figure 6-2 Example of a Keycloak Realm
Here, the we provide an example of
enabling of Keycloak SSO in ResilBlockly. The following sub-sections describe
the steps performed for securing ResilBlockly with Keycloak. It is worth noting
that several technologies and methods to integrate Keycloak in applications
exists, hence this procedure is not the only one applicable but could be
followed for interfacing any other service with the secure authentication
mechanism.
The first step for enabling
Keycloak functionalities is to install it on a server. Different installation
packets are available, depending on the machine architecture and operating
system on which Keycloak have to be installed. After installed, Keycloak is available
for default at http://localhost:8180 and
the user can authenticate in the administrator login page shown in figure
below.
Figure 6-2 Administrator Log in form in Keycloak
Keycloak uses realms to manage
security metadata for a set of users and applications. Once logged in Keycloak,
it is possible access the “Realm Settings” through the left menu for adding a
realm, as figure below shows. A dedicate realm for the 7SHIELD project has been
defined as “7Shield” realm.
Figure
6‑3 –7SHIELD Realm
Settings menu in Keycloak
6.1.2 Application Client Configuration
Applications that integrate
Keycloak services are simply named clients. The single steps for setting up the
ResilBlockly client in Keycloak are described in the following:
2.
Once logged in Keycloak, select
the already defined “7Shield” realm which allow the administrator to add new
clients;
3.
At this point, the ResilBlockly
client should be created. The “Clients” menu (on the Keycloak left menu) allows
the administrator to access the lookup table of the existing clients, in the
figure below, and create a new one. Click on the “Create” button”.
Figure
6‑4 –7SHIELD Lookup
table of clients
4.
After clicking on the “Create”
button, the “Add Client” form represented in figure below will open. Here it is
sufficient to enter the ID associated with the client application (i.e., resilblockly-app).
Hence, enter the Client ID and save.
Figure
6‑5 –7SHIELD The Keycloak Add Client form
5.
After saved, further data
should be provided in the “Settings” tab. Such data are reported in Table 1.
Table 1 ResilBlockly client configuration parameters
|
Property
|
Value
|
|
Client ID
|
resilblockly-app
|
|
Name
|
ResilBlockly
|
|
Enabled
|
On
|
|
Client
protocol
|
openid-connect
|
|
Access Type
|
confidential
|
|
Standard
Flow Enabled
|
On
|
|
Implicit
Flow Enabled
|
On
|
|
Direct
Access Grants Enable
|
On
|
|
Service
Accounts Enabled
|
On
|
|
OAuth 2.0
Device Authorization Grant Enabled
|
On
|
|
Authorization
Enabled
|
On
|
|
Valid
Redirect URIs
|
/admin/xxxxx/console/
|
|
Base URL
|
/admin/xxxxx/console/
|
6.
Next step is to retrieve the
token “Secret” in the tab “Credentials”. It will be necessary for
authenticating the client on the Keycloak Admin REST API programmatically,
together with the “Client ID”. Following figure represents the tab Credentials in which such token “Secret” is
provided.
Figure
6‑6 –7SHIELD The Keycloak credential form
6.1.3 Application Roles Configuration
Roles (i.e., permission types) can
be defined at the realm level and they can be assigned to users belonging to
that realm. Definition of the roles is needed in order to establish which users
are authorized to access the application and to manage their rights within the
application.
Hence, next action is the
definition of the roles that users have in ResilBlockly. In the “Service
Account Roles”, by using the dropdown list “Client Roles”, the “realm-management”
should be selected. The roles to be assigned to the user have to be moved from
the left “Available Roles” to the right “Assigned Roles” text area.
In particular, definition of roles
for the application involves the following actions:
1.
Open of the menu “Roles” in
which roles for ResilBlockly application have been already defined;
2.
Click on the button “Add Role”
for opening the dedicated form;
3.
Insert the “Role Name” and
eventually a description of the role.
The figure below shows the Keycloak
form in which the role name is a required attribute while the role description
is optional.
Figure
6‑7 –The Keycloak Add
Role form
6.1.4 Application Group Configuration
Groups in Keycloak allow the
administrator to manage a common set of attributes and mapping roles for a set
of users. Users can be members of zero or more groups and they inherit the
attributes and roles assigned to their group. Groups can be managed through the
“Groups” left menu item depicted in figure below.
Figure
6‑8 – The left menu item
Defining groups is performed by the
administrator with the following simple steps:
1.
Open of the “Groups” menu;
2.
Click on the button “New” into
the “Groups” tab;
3.
Insert a name for the group and
click on the button “Save”;
4.
In the tab “Role Mappings”
(depicted in figure below)from the left text area “Available Roles”, select one
or more roles to be associated with the group and click on the “Add selected”
button.
Figure
6‑9 –The Role Mappings
Tab
6.1.5 Application User Configuration
The last step of the procedure is
the application user configuration. For using an application, each user must
authenticate on Keycloak which enables such user on that application. In
addition to guaranteeing secure access, Keycloak must manage users' rights on
the applications they can use. This is done by associating users with the
already defined groups.
For configuring ResilBlockly users the following steps
should be performed:
1.
Access the menu “Users” from
the Keycloak left menu;
2.
Click on the button “Add User” for accessing
the “Add user” interface, shown in figure below;
Figure
6‑10 –The “Add user” interface
3.
Provide the following data for
the new user, including the group to which the user is to be associated.
Table
2
ResilBlockly application users configuration parameters
|
Property
|
Value
|
|
E-Mail
|
e.g.,
name.surname@domain.com
|
|
First Name
|
name
|
|
Last Name
|
surname
|
|
User
Enabled
|
On
|
|
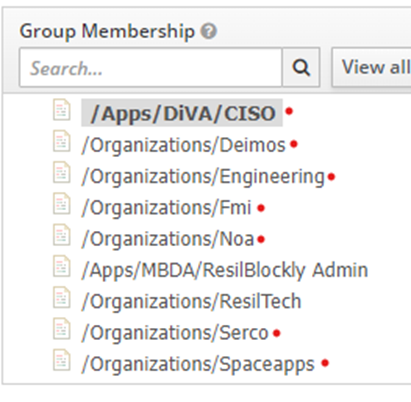
Groups
|
The Groups
with red dot
|
5.
In the tab “Credentials”,
insert a password which is compliant with the security policy defined in
7SHIELD.
6.2 Getting Started
The following prerequirements are
foreseen:
1
The 7SHIELD secure
authentication mechanism is up and running and accessible via the internet.
2
The administrative user has
been created
The type of users defined
are the following:
- Administrators: have the highest
level of access to an account and can manage the users in your organization and
the applications they need.
- Users/Operators: are able to log into the system. They can
have attributes associated with themselves like email, username, address, phone
number, and birthday. They can be assigned group membership and have specific
roles assigned to them.
6.3 Nominal operations
Below are listed the most common
operations that can be performed on keycloak via GUI and the associated type of
users.
|
Operation
|
Administrator
|
User
|
|
Realm
management
|
x
|
|
|
User
management
|
x
|
x
|
|
Group
management
|
x
|
x
|
The following paragraphs will detail the current
configuration of the operations listed above and how to configure them on
keycloak.
A realm is a space where the
administrator can manage objects, including users, applications, roles, and
groups. The access to a service is managed by the realm and users are
associated to a realm which enables the user to access to the linked services.
The 7SHIELD administrator can access to
the Realm management panel and can configure the operations listed below:
- Configuring SSL for a realm
- Clearing server caches
- Configuring themes and
internationalization
- Controlling login options
- Configuring realm keys
Here after, the steps of the realm
management operations done in the 7SHIELD project are listed:
- Realm creation;
- SMTP server configuration;
- Brute force attacks detection configuration.
The steps to create a realm are detailed below.
1.
Point to the top of the left
panel.
Figure
6‑11 – Realm creation graphical user interface
3.
Enter a name for the realm.
Figure
6‑12 – Realm creation graphical user interface#2
6.3.1.2 SMTP Server configuration
Keycloak natively provides the possibility
to send emails for
- email verification
- forgot password
- notifications about a server event (to administrators)
In order to enable Keycloak to send
emails, the SMTP server settings needs to be updated as follow.
1.
Click Realm Settings in
the menu.
Figure
6‑13 – Email server management graphical user
interface
3.
Fill in the fields and toggle
the switches as needed. Table below describes the fields.
Table
6‑3 – Field settings of SMTP server
|
Field name
|
Description
|
|
Host
|
Host denotes the SMTP server hostname
used for sending emails.
|
|
Port
|
Port denotes the SMTP server port.
|
|
From
|
From denotes the address used for the
From SMTP-Header for the emails sent.
|
|
From Display Name
|
From Display Name allows to configure a
user friendly email address aliases (optional). If not set the plain From
email address will be displayed in email clients.
|
|
Reply To
|
Reply To denotes the address used for
the Reply-To SMTP-Header for the mails sent (optional). If not set the plain
From email address will be used.
|
|
Reply To Display Name
|
Reply To Display Name allows to
configure a user friendly email address aliases (optional). If not set the
plain Reply To email address will be displayed.
|
|
Envelope From
|
Envelope From denotes the Bounce Address
used for the Return-Path SMTP-Header for the mails sent (optional).
|
|
Enable SSL and Enable StartTSL
|
Toggle one of these switches to ON to
support sending emails for recovering usernames and passwords, especially if
the SMTP server is on an external network. You will most likely need to
change the Port to 465, the default port for SSL/TLS.
|
|
Enable Authentication
|
Set this switch to ON if your SMTP
server requires authentication. When prompted, supply the Username and
Password. The value of the Password field can refer a value from an external
vault.
|
Figure
6‑14 – Realm configuration graphical user
interface – email setup
6.3.1.3 Brute Force Attack Detection
A brute force attack attempts to guess a
user’s password by trying to log in multiple times. Keycloak has brute force
detection capabilities and can temporarily disable a user account if the number
of login failures exceeds a specified threshold.
1.
Click Realm
Settings in the menu
2.
Click the Security
Defenses tab.
3.
Click the Brute Force Detection tab
Figure
6‑15 – Realm configuration graphical user
interface – brute force detection
Keycloak can deploy permanent lockout and temporary lockout actions when it
detects an attack. Permanent lockout disables a user account until an
administrator re-enables it. Temporary lockout disables a user account for a
specific period of time. The time period that the account is disabled increases
as the attack continues.
|
|
|
|
|
The maximum number of login failures. |
|
|
The time added to the time a user is temporarily disabled when the user’s
login attempts exceed Max Login Failures. |
Quick Login Check
Milli Seconds |
The minimum time between login attempts. |
|
|
The minimum time the user is disabled when login attempts are quicker
than Quick Login Check Milliseconds |
|
|
The maximum time a user is temporarily disabled |
|
|
The time when the failure count resets. The timer runs from the last
failed login |
Table
6‑4
– Field settings of Brute
force attack detection
The administrators have a wide
range of operations to manage users such
as
-
Enabling account deletion by users
-
Configuring user attributes
-
Configuring User credentials
-
Configuring Required actions
-
Personal data collected by Keycloak
Here after, the steps of the creation of
new users into a realm are listed.
1.
Click the entry Users in the menu.
Figure
6‑16 –Users management graphical user interface
3. Enter
the details for the new user.
Figure
6‑17 –Users creation graphical user interface
NOTE: the
mail field is mandatory because the mail will have to be confirmed later.
4. Enter the other fields
- First Name
- Last Name
- User Enabled: ON
- Email verified: OFF
- Groups: select the group of the organization you
belong to.
- Go to the section Credentials and select
the password.
Note: set the field
Temporary to OFF.
Figure
6‑18 –Users’ password management graphical user
interface
Groups have the purpose to give users
access and permissions to use services connected to Secure Authentication
Mechanism.
The steps for adding a user to a group
are liste below:
1.
Click Users in
the menu.
2.
Click the user that you want to perform a role mapping on. If the user
is not displayed, click View all users.
3.
To select the groups of each user go to the item
" groups " where you can join or leave the groups for the user.
Figure
6‑19 –Groups management graphical user interface
The 7SHIELD secure authentication
mechanism has default groups assigned to new users. To set up such default
groups the steps are the following.
1.
Click Groups in the menu.
2.
Click the Default Groups tab.
3.
Click on add to add Groups from "Available
groups" to "Default group"
Figure
6‑20 –Groups management graphical user
interface#2
6.4 Other operations in 7SHILED integrated modules
The integration of the Secure
authentication mechanism with other 7SHIELD modules, such as the cyber attack
detection framework provides the operator with the possibility to receive an
alert on the CPTM Dashboard whenever an
attempt of brute force attack is detected. We refer the cyber attack detection
framework documentation for the procedure for the alert visualization
7. User Interface
The Secure authentication mechanism
exposes a number of interfaces outlined in this Chapter.
The exposed interfaces are
available to dedicated types of users according their functionalities.
The type of users defined
are the following:
- Administrators: have the highest
level of access to an account and can manage the users in your organization and
the applications they need.
- Users/Operators: are able to log into the system. They can
have attributes associated with themselves like email, username, address, phone
number, and birthday. They can be assigned group membership and have specific
roles assigned to them.
The exposed interfaces implemented
by the secure authentication mechanism design are:
1.
Graphical user interface
(GUI): is a user interface, available to both
administrators and users, that allows users to interact with electronic devices
through graphical icons and audio indicator such as primary notation, instead
of text-based user interfaces or typed command labels or text navigation.
2.
Application Program
Interface (API): available to both administrators
and users, is a connection between computers or between computer programs. It
is a type of software interface, offering a service to other pieces of software.
The standard used for the API in the secure authentication mechanism is the
OpenID protocol and SAML 2.0.
As a result of the study of the
integration with other 7SHIELD modules, the secure authentication mechanism exposes
further interfaces including some
predefined measurement of the secure authentication usage and security. Such
measurement will be visualized in external panels such as:
a. Monitoring panels: are a several number of pages available online on the CPTM Dashboard
and accessible upon authentication. Such pages include more than one analytics
on the usage of the secure authentication mechanism in real time (such as
logins).
b. Security panel: is a page included in the Cyber Attack Detection Framework UI listing
the major cyber-attack events (such as brute force attacks).
Below it is provided with a description
of the main functions available in the listed exposed interfaces and includes some
example of their usage.
7.2 Application Programming Interface (API)
7SHIELD secure authentication mechanism
provides a API interface and for creating new users via APIs, two steps are
necessary and an example is provided below:
1.
Request for a token at
keycloak realm master
curl --location --request POST
'https://oidc.7shield.eu:32644/auth/realms/master/protocol/openid-connect/token'
--header 'Content-Type: application/x-www-form-urlencoded' --data-urlencode
'grant_type=client_credentials' --data-urlencode 'client_id=admin-cli'
--data-urlencode 'client_secret=a6eea658-735f-4273-8e4e-5285a8bd1cbd' –insecure
2.
Use the token 'TOKEN_ID' to
request the creation of a new user in a specific keycloak realm
curl --location --request POST 'https://oidc.7shield.eu:32644/auth/admin/realms/ONDA-DIAS/users'
--header 'Content-Type: application/json' --header 'Authorization: Bearer TOKEN_ID' --data-raw
'{"firstName":"test","lastName":"test",
"email":"xxx@yyyy.com",
"enabled":"true", "username":"test"}'
–insecure
ANNEX I - Secure Authentication mechanism default port application list and network policies
The Table 0‑1
includes the default port application list and their type.
|
Application
|
Port
|
Application
|
Type
|
|
Keycloak
|
9990
|
HTTP
|
management-http
|
|
9993
|
SSL (HTTP)
|
management-https
|
|
8009
|
Proxy Jboss
|
ajp
|
|
8080
|
HTTP
|
Web
|
|
8443
|
SSL (HTTPS)
|
Web https
|
|
4712
|
txn-recovery-environment
|
Transaction Collection Manager
|
|
4713
|
txn-status-manager
|
Transaction manager
|
|
25
|
SMTP
|
mail-smtp
|
|
Hyperlegder
|
80
|
HTTP
|
Web access
|
|
443
|
HTTP
|
Web access (HTTPS)
|
|
9984
|
N/A
|
inbound HTTP (TCP) traffic from Hyperledger
clients sending transactions to the Hyperledger HTTP API.
|
|
9985
|
HTTP
|
inbound WebSocket traffic from Hyperledger
clients
|
|
26656
|
unassigned
|
inbound Tendermint P2P traffic from other
Tendermint peers
|
|
9986
|
HTTP
|
accessing the Public Key of a Tendermint
instance
|
|
ApiSix
|
8080
|
HTTP/HTTPS
|
Dashboard access
|
|
80
|
HTTP
|
Web access
|
|
443
|
HTTPS
|
Web access (HTTPS)
|
|
MFA
|
3000
|
http/https
|
MFA server
|
|
Grafana
|
3000
|
http/https
|
grafana server
|
|
Graylog
|
9000
|
http/https
|
graylog server
|